How to Block No Sender Emails [Gmail, Yahoo, Outlook & Apple Mail]
![How to Block No Sender Emails [Gmail, Yahoo, Outlook & Apple Mail]](https://foyercus.blob.core.windows.net/287a2408185e68c371c/blog/270/c/7b4ea89f-14ac-4b4f-adfd-c06cfaf17d41.jpg)
![How to Block No Sender Emails [Gmail, Yahoo, Outlook & Apple Mail]](https://foyercus.blob.core.windows.net/287a2408185e68c371c/blog/270/c/7b4ea89f-14ac-4b4f-adfd-c06cfaf17d41.jpg)
If you’re getting spam emails that are missing a sender (or if the sender shows up as “<>”), it can get annoying real quick.
No sender emails are especially pesky because every email provider has a different way to filter them out. Some email providers don’t even have a proper solution!
We made this guide so you can figure out how to block no sender emails for any email provider. Whether you are using Outlook, Gmail, Yahoo Mail, or Apple Mail, we have a solution for you. Even if your email service doesn’t have a setting for no sender emails, we have a few tips that could help you out like applying text filters, and reporting emails as spam.
Before we get into the solutions, let’s go over exactly what a no sender email is.
What are No Sender Emails?
No sender emails are emails that are sent without information about the real email address who sent them.
It’s like receiving an envelope mailed to you with no return address.
No sender emails are used by spammers and hackers to send junk and phishing emails. They are commonly used to confuse people so you don’t know who sent the emails (which makes them harder to block).
You may wonder why email services even allow for emails to be sent without a sender.
Well, just like how regular mail allows envelopes to be sent without a return address, email allows for emails to be sent with no email address (or even fake email addresses). It is just part of the standard rules of how email works.
Many email providers have the ability to filter out these emails by default, but choose not to. So unfortunately, you’ll have to set up your own rules to block no sender emails yourself.
Even though they are called “No Sender” emails, there is still a real sender, and typically it is just a matter of knowing where to find the real email address within your email provider (e.g., Gmail, Outlook, Apple Mail, Yahoo).
In a few complicated cases, the real sender's email address is missing too. If you are unable to find the true sender's email address (we show how to find it in this post), you'll have to use email filters to block messages either based on the content of the message itself, or by creating a rule that moves any empty emails to a junk folder.
With a clear understanding of what these emails are, let’s get into how you can block these emails for each email provider.
We’ll start with Gmail, but just scroll down to find the email service you use.
How to Block No Sender Emails in Gmail
In Gmail, you can block "No Sender" emails by using Google's "block sender" option. Check out the "No Sender" email example below. It should look familiar to you:
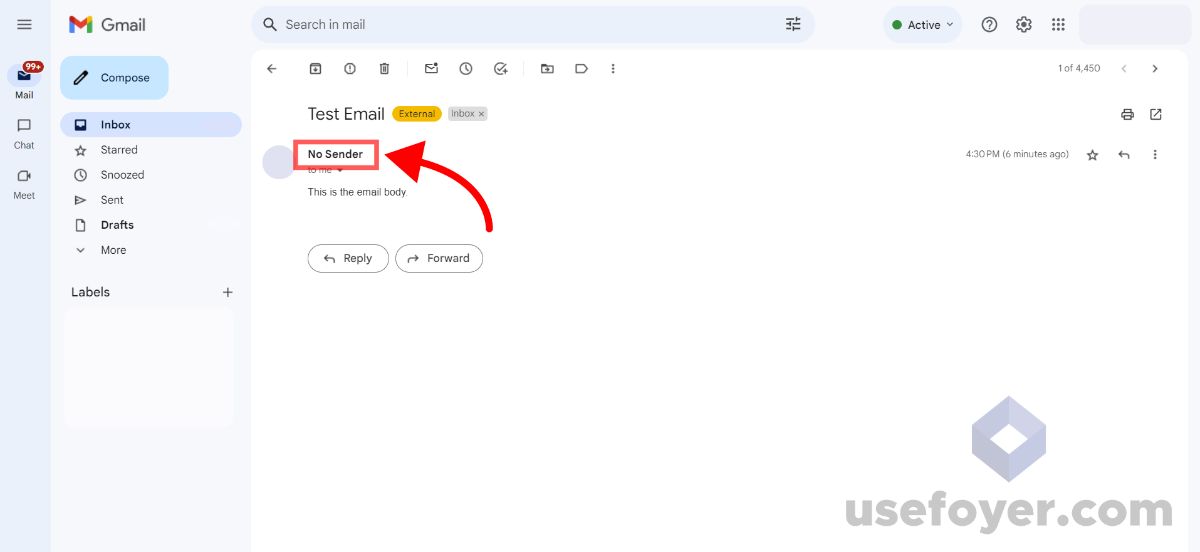 You can see that the name listed is "No Sender". If you click on the name, you should be able to see the real email address where the message came from.
All we have to do is make a rule to move messages from the true sender to your spam folder.
To get started, click the 3 dots on the right side of the message. A dropdown menu will come up. Click on the "Block 'No Sender'" option.
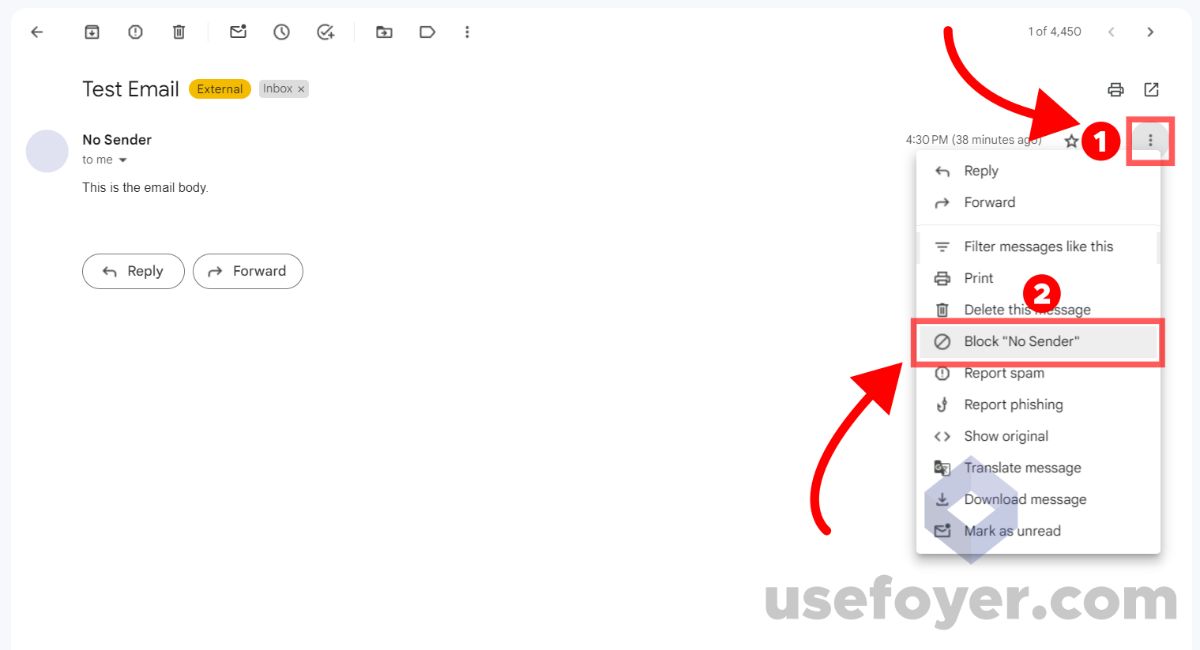
You will be asked to confirm that all messages from this sender will be automatically marked as spam. You will also be given the real email address of the sender. Click "Block" to confirm.
If you run into any issues, check out Google's official guide here.
What to Do If Blocking by Sender Doesn't Work in Gmail
If you can't block an email based on the sender in Gmail, you can always create an email filter rule that automatically deletes those emails instead.
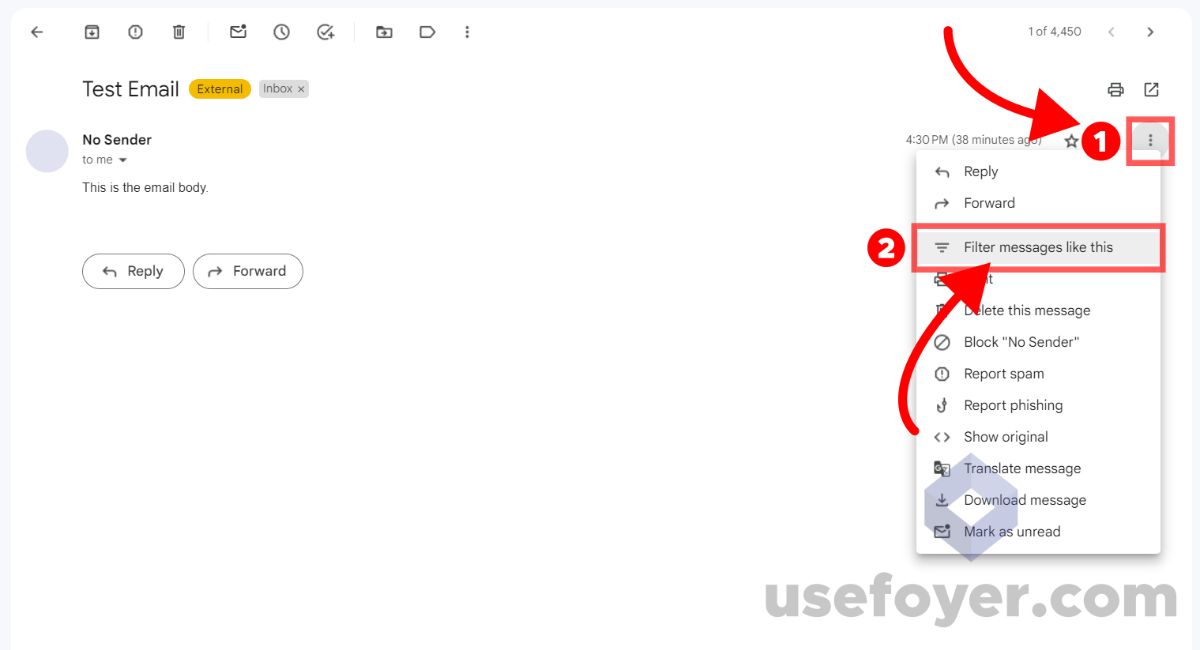
To create a rule in Gmail, navigate to the email you'd like to block, and find the 3 vertical dots to the right of the email. Click it, and you'll see a dropdown with an option to "Filter messages like these". Click that option.
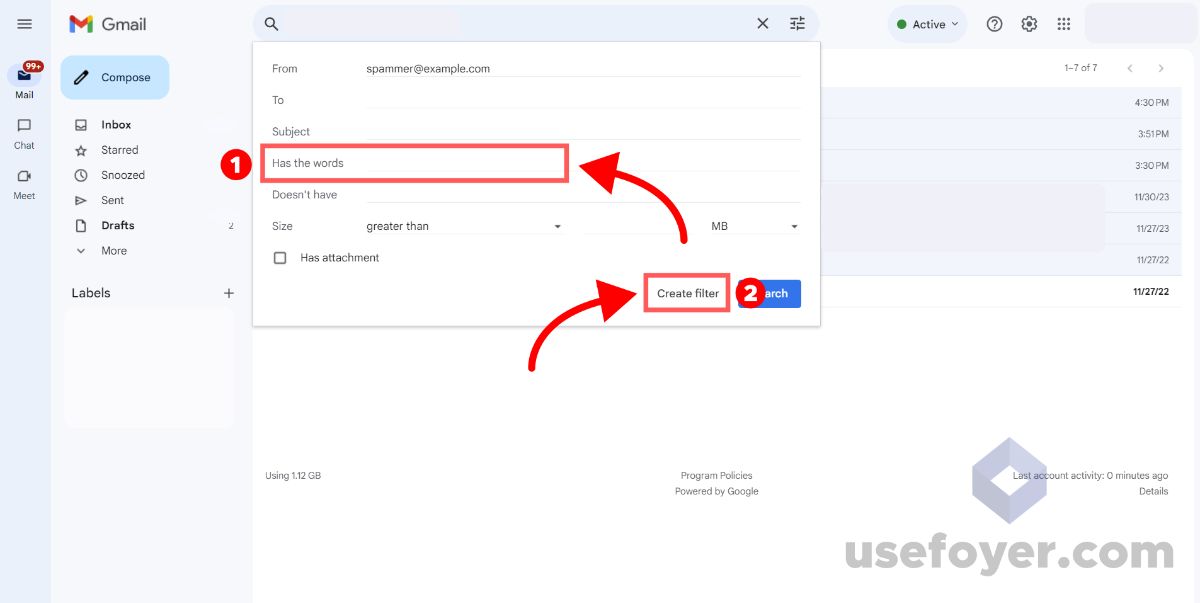
 You'll see a dialog come up where you can specify which emails the filter should activate for. You can choose emails based on the "To", "From", words inside the email, and more.
If you know the real email address of the sender, you can use that. Otherwise you'll have to identify some common text that you want to block, and add it to the "Has the words" section.
When you're done, click "Create Filter", then you'll be able to choose what action the filter should execute.
 Gmail lets you choose from many different actions. You can automatically delete emails, mark as important, mark as read, and more.
We are looking to block emails, so the best option here is to choose "Delete it".
Click "Create filter" and the rule will be enabled.
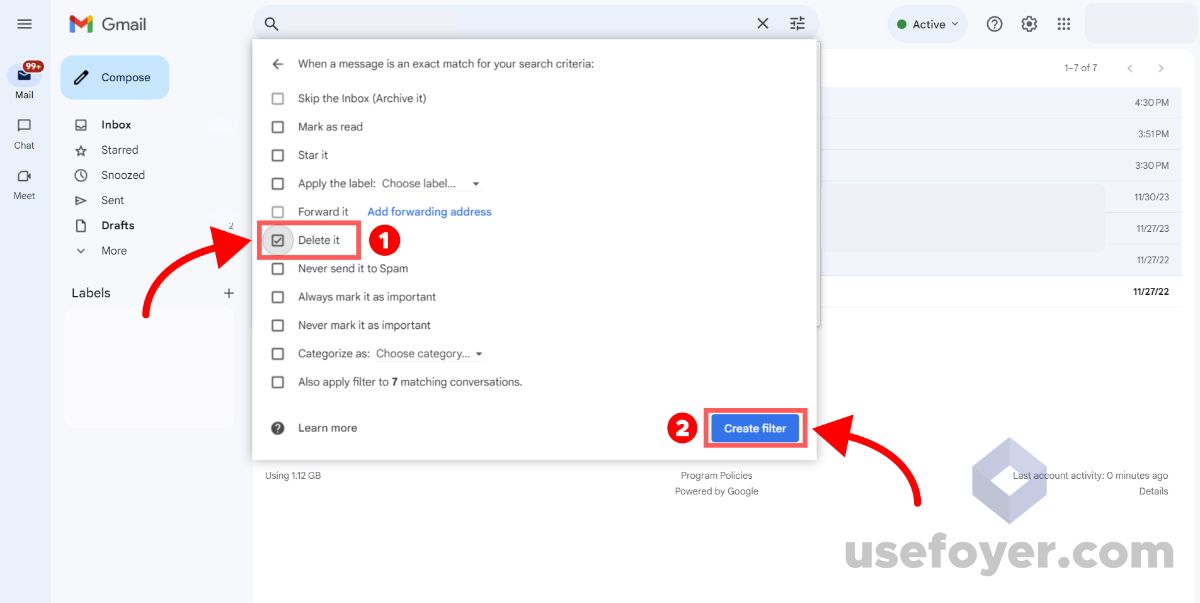 Use Google's official guide on creating filters to see all of the options.
How to Block No Sender Emails on iPhones and iPads
If you're getting "No Sender" emails on your Mail app on iPhone or iPad, don't worry! There's a quick and easy way to block them.
First, go to your Mail app, and scroll to find the "No Sender" email.
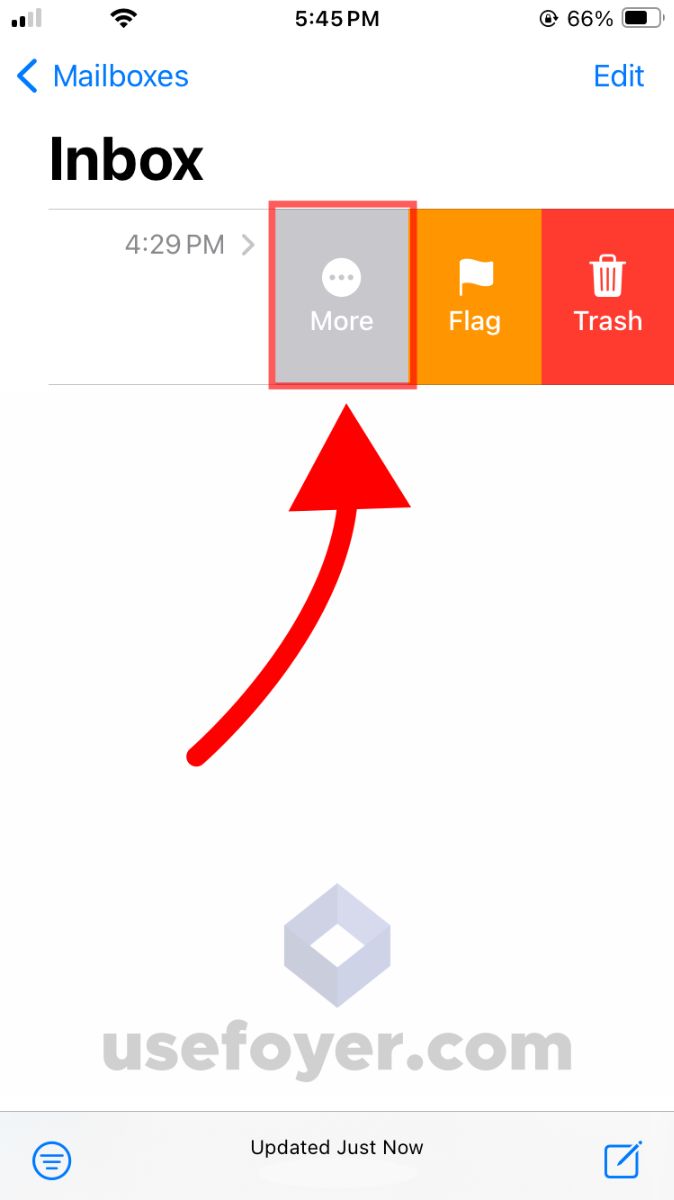
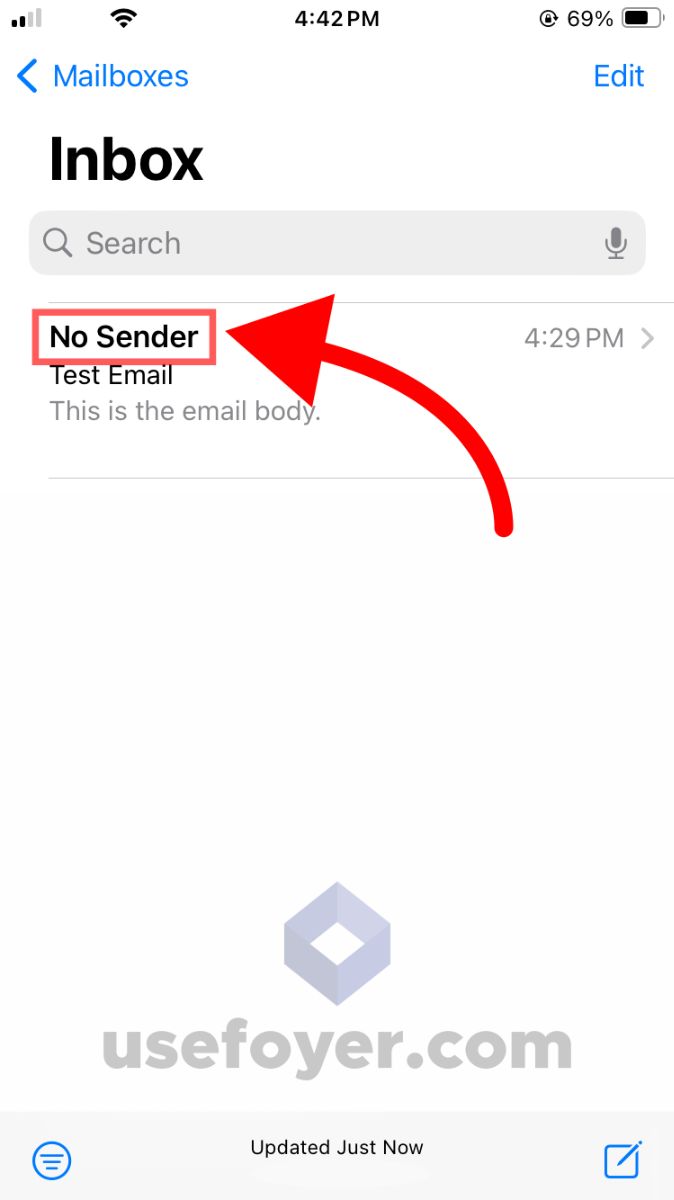 Then, you'll need to swipe to the left, and you'll see a few options to choose from including "More", "Flag", and "Trash".
Click on the "More" option.
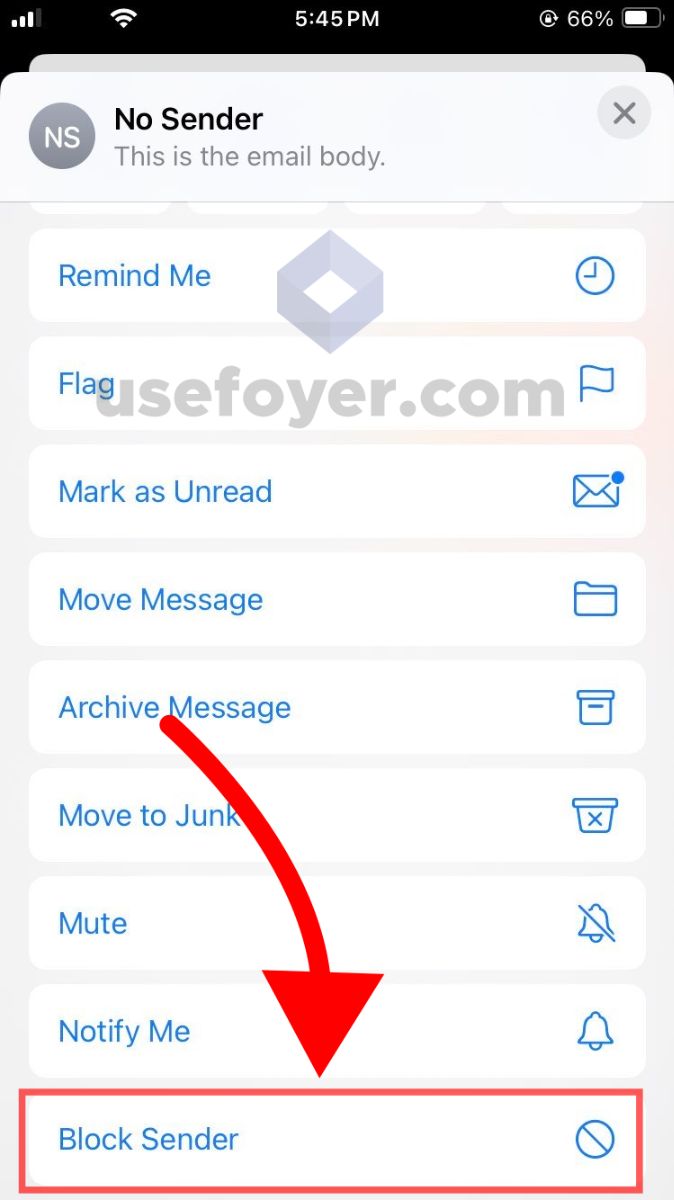
 From there, you'll see a menu. Scroll down to the last option called "Block Sender". Click that option, and all emails from the real sender of the email will be blocked.
 There's another way to fix this issue in Apple Mail, so if you have any issues with blocking no sender emails on your iPhone or iPad, you can try the next section below on how to block no sender emails in Apple Mail (on Mac).
But, if all your emails on your iPhone are listed as "No Sender" and have no content, you might be running into another issue. In iOS 13 there was an issue many users ran into where every single email said "No Sender". If that's the case, check out this guide on how to fix that issue.
How to Block No Sender Emails in Apple Mail (for Mac)
The Mail app on Mac (and also the web version of iCloud) allows you to block no sender emails too.
To get started, visit iCloud and login. Navigate to the Mail App, and click the Settings icon on the top of the screen. Then, on the dropdown menu, click "Settings".
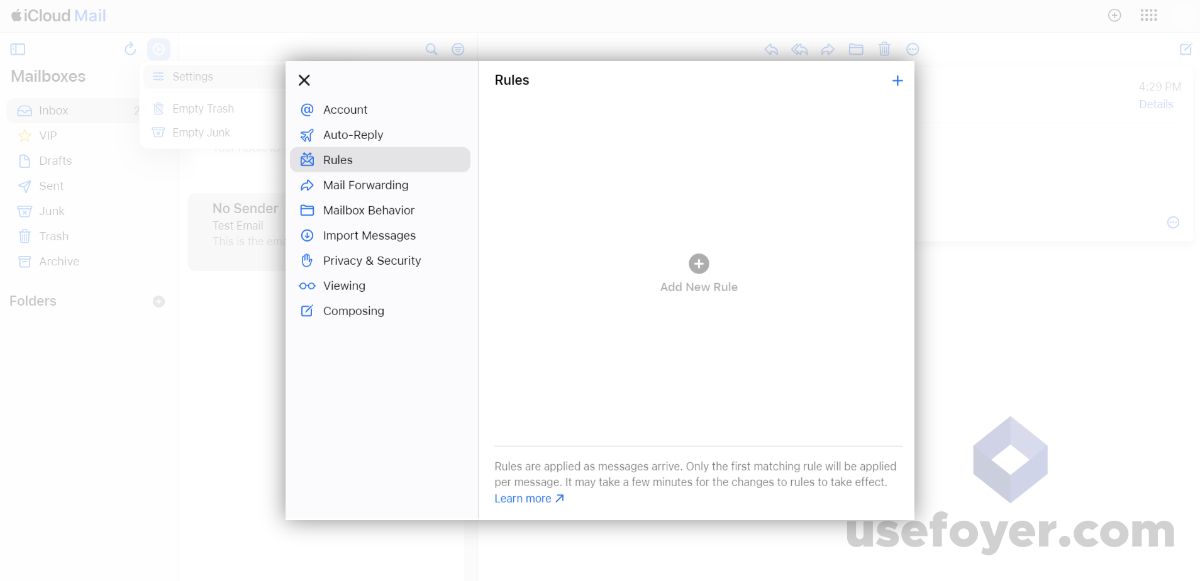
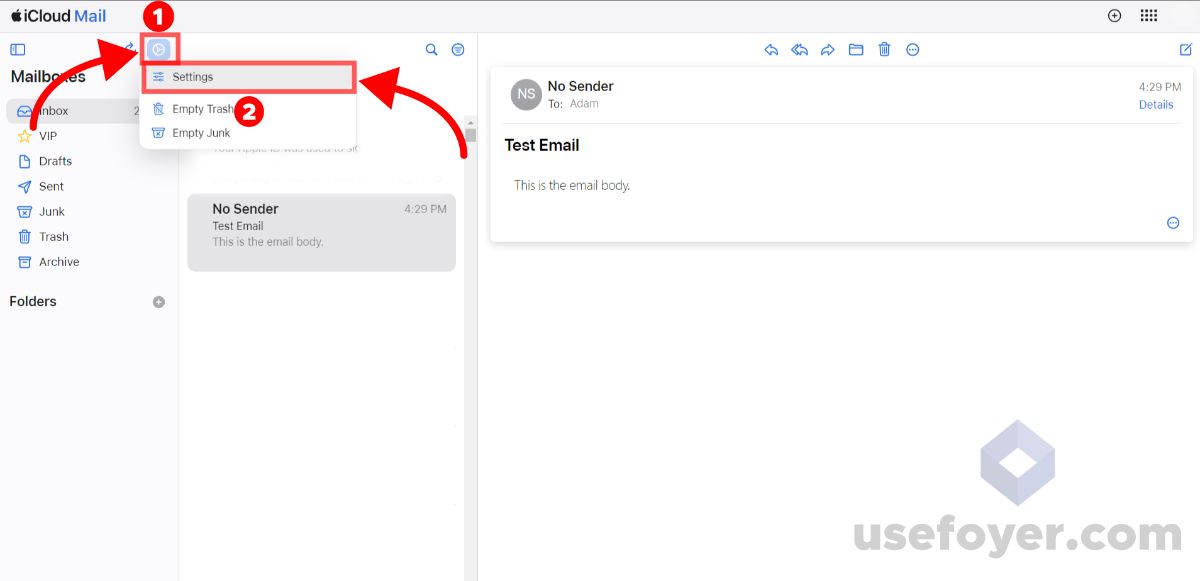 A dialog box will come up that shows all your iCloud settings. On the left side, click the "Rules" button.
On the right side of the screen you'll see an option to add a new rule. Click the "+" icon to create a rule.
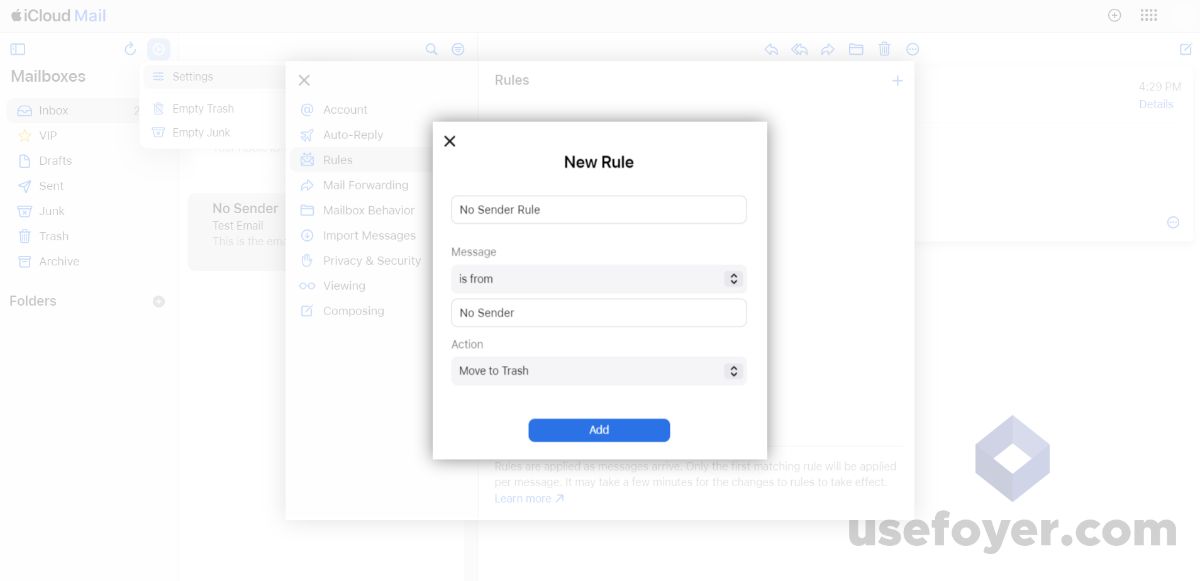
 Another dialog will come up where you can customize your own iCloud mail rule. Name the rule "No Sender Rule".
In the "Message" section we can choose which emails to select. In this case, we want to select "is from" and enter "No Sender" to choose all emails who's name is "No Sender".
In the "Action" section, select "Move to Trash". Finally, click "Add" to enable the rule.
 How to See Who Sent an Email in iCloud
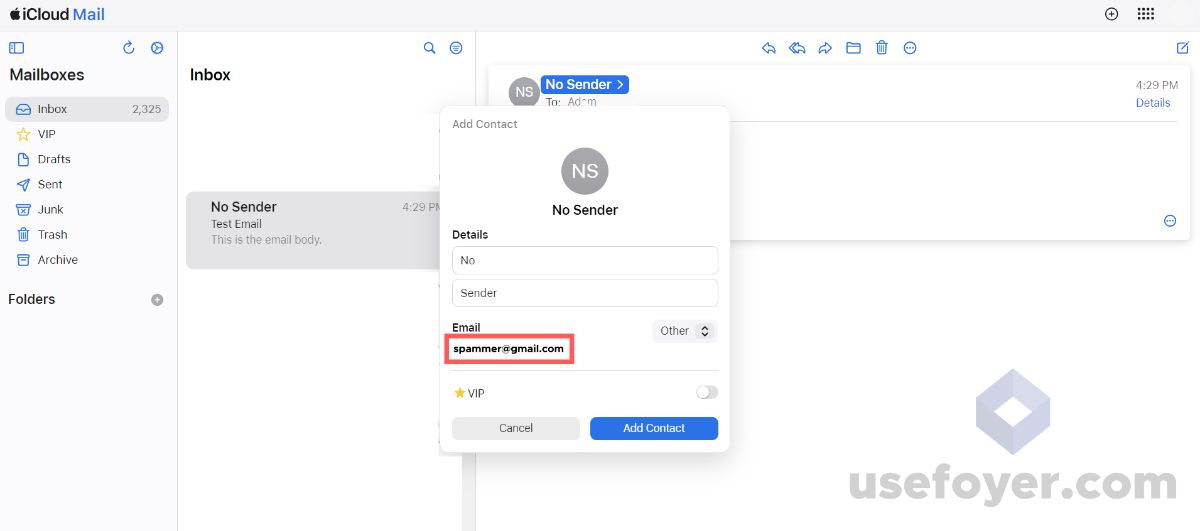
To view the real email address who sent you a message in iCloud, just login to iCloud and navigate to the Mail app.
Then scroll to the email you want to check. Click on the email, and then click on the name of the sender (in this case the name is "No Sender").
A pop-up will appear that shows some information on the sender which includes the real email address that the email was sent from.
How to Block No Sender Emails in Outlook
In Outlook, you can use email rules to block no sender emails.
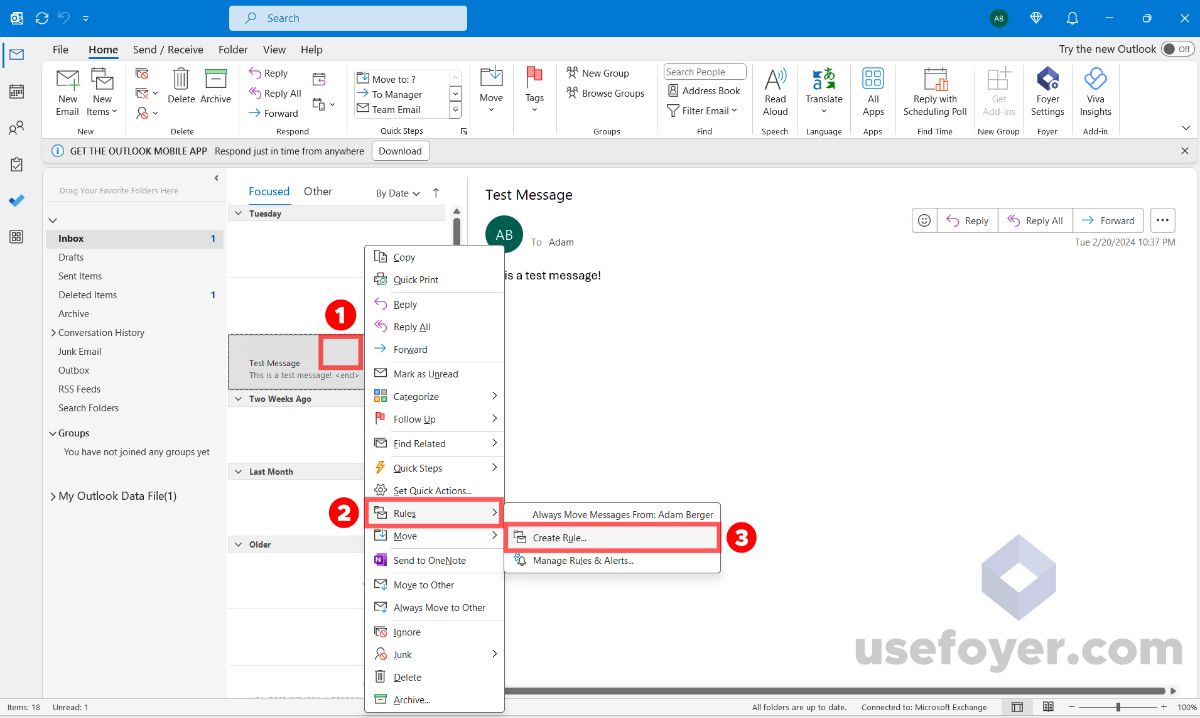
To get started, open up Outlook (for desktop) and, in your inbox, scroll down to the no sender email you want to block.
Right click anywhere on the email (in the email list), and you'll see a menu come up.
Hover over the "Rules" option, and then click "Create Rule...".
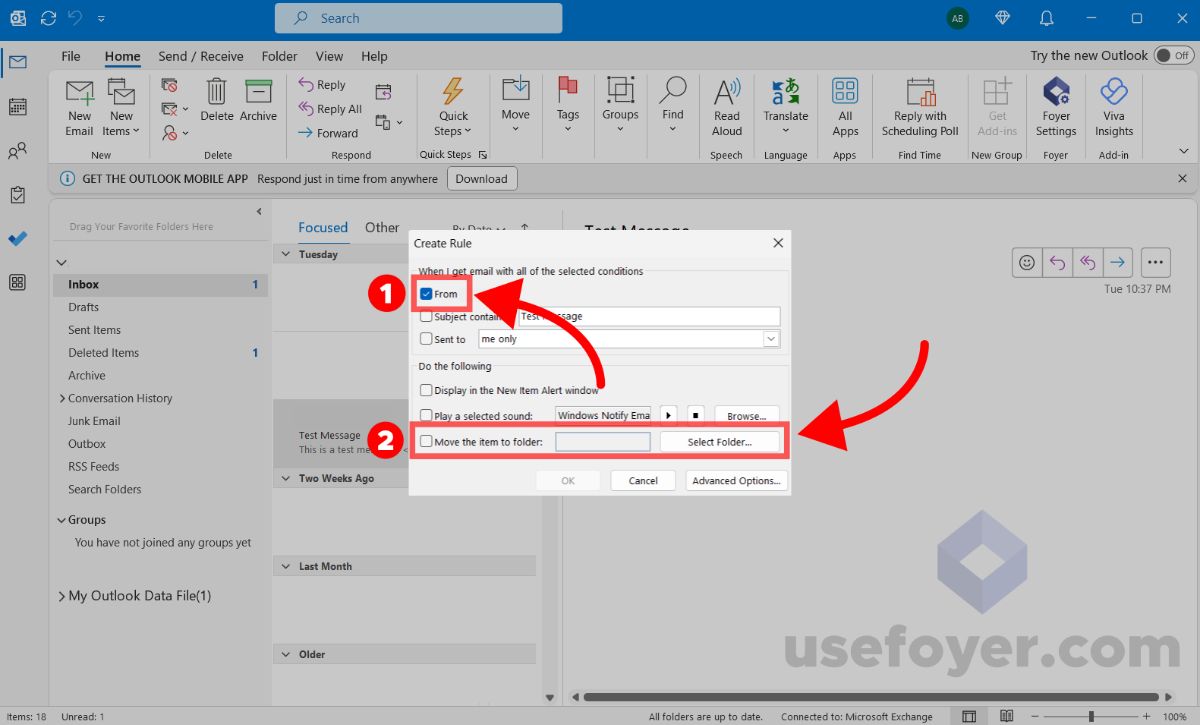
 In the Create Rule dialog, make sure the check the "From" checkbox. To the right of that checkbox you'll see the real sender's email address.
If you don't see an email to the right of "From", keep reading! In the next section, I'll give you an option on how to move any missing email addresses into the "Junk Email" folder.
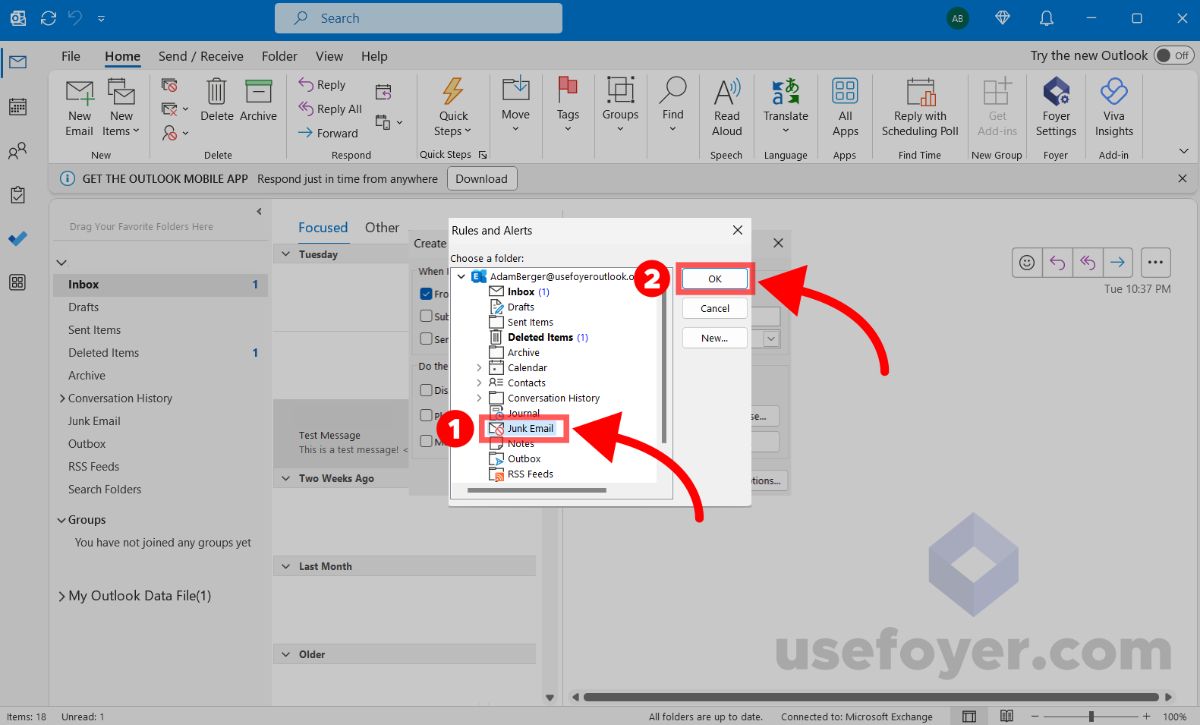
Next, check the "Move the item to folder" checkbox, and click "Select Folder..." and select the "Junk Email" folder.
 In the screenshot below, you can see the "Select Folder..." dialog. Choose "Junk Email" on the left, and then "OK" on the right.
How to Block Emails with an Empty Email Address in Outlook
If you weren't able to move no sender emails to the "Junk Email" folder via an email rule because the sender's email was empty, there's another strategy you can try.
Check out this guide from windowsreport.com on how to create a rule to move any email addresses that are missing a "@" symbol in them can be moved to the "Junk Folder".
This is a great solution when a no sender email does not show the real sender's address (because any email address that is missing a "@" is an empty email address).
How to Block No Sender Emails in Yahoo Mail
Yahoo Mail lets you block based of the real sender of an email, which you can use to block no sender emails.
To get started, visit Yahoo Mail and navigate to the no sender email you want to block.
The message could be in your spam folder so be sure to check there too.
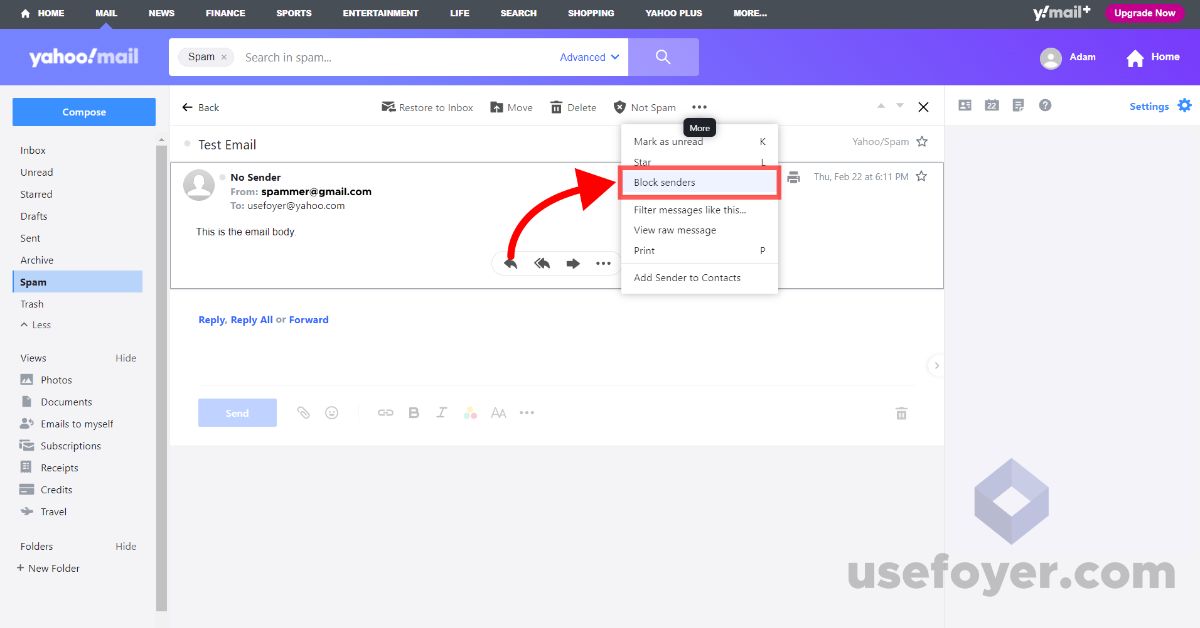
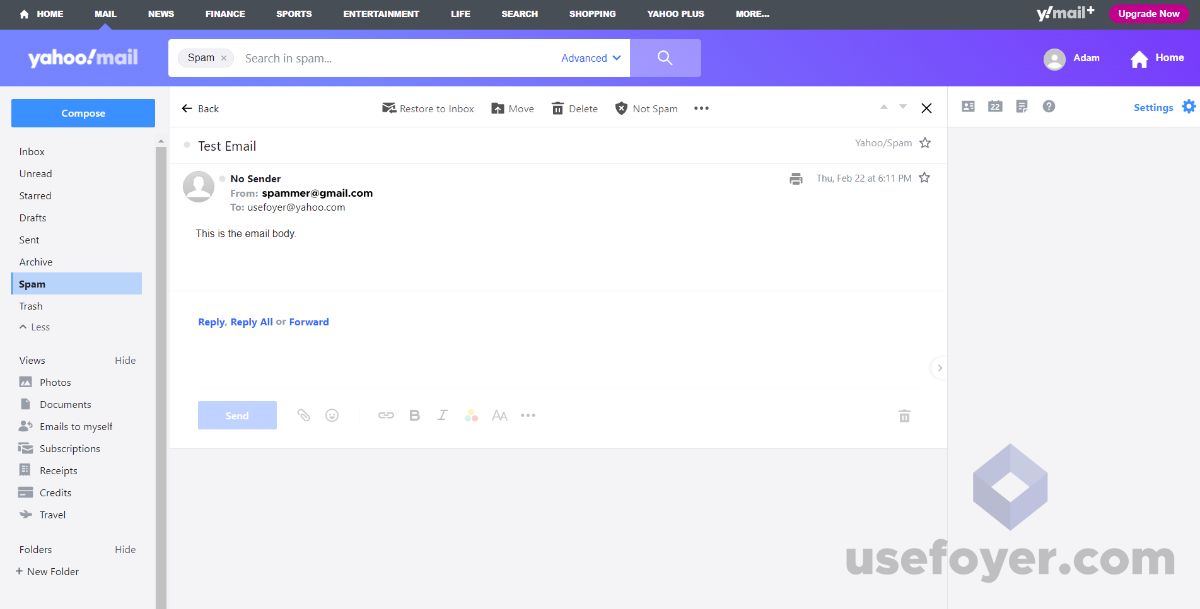 Once you've found the no sender email in Yahoo Mail, click the 3 horizontal dots above the email.
In the dropdown, click "Block senders".
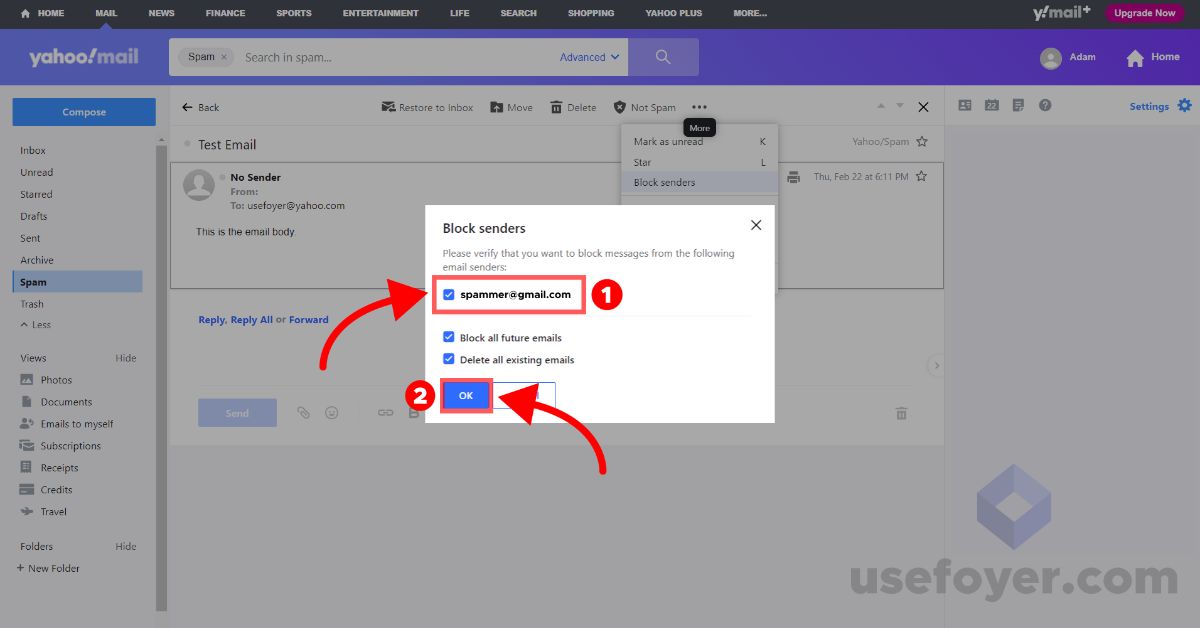
 A "Block senders" dialog will appear.
Be sure to click the first checkbox to block the real sender's email.
Check that both "Block all future emails" and "Delete all existing emails" is enabled.
Finally, click "OK" to apply the rule.
 If you have any problem setting up a rule in Yahoo Mail, you can try to follow the steps here too.
What to Do If You Can't Block An Email By Sender
If you're not able to block an email by sender, then you might think you can't block no sender emails.
But, that's not quite true. There are still a few things you can try.
How to Automatically Delete Spam Emails (In Gmail)
First, you can filter emails by their content and subjects. If you're receiving spam emails, and you can identify a pattern between all of the emails, then you can easily make a rule to handle it.
For example, if the spam contains "free iphone" in the subject, you can create a rule to move any emails with a subject that contains that into a spam folder.
In the screenshot below, you can see all the options Gmail provides for filtering emails.
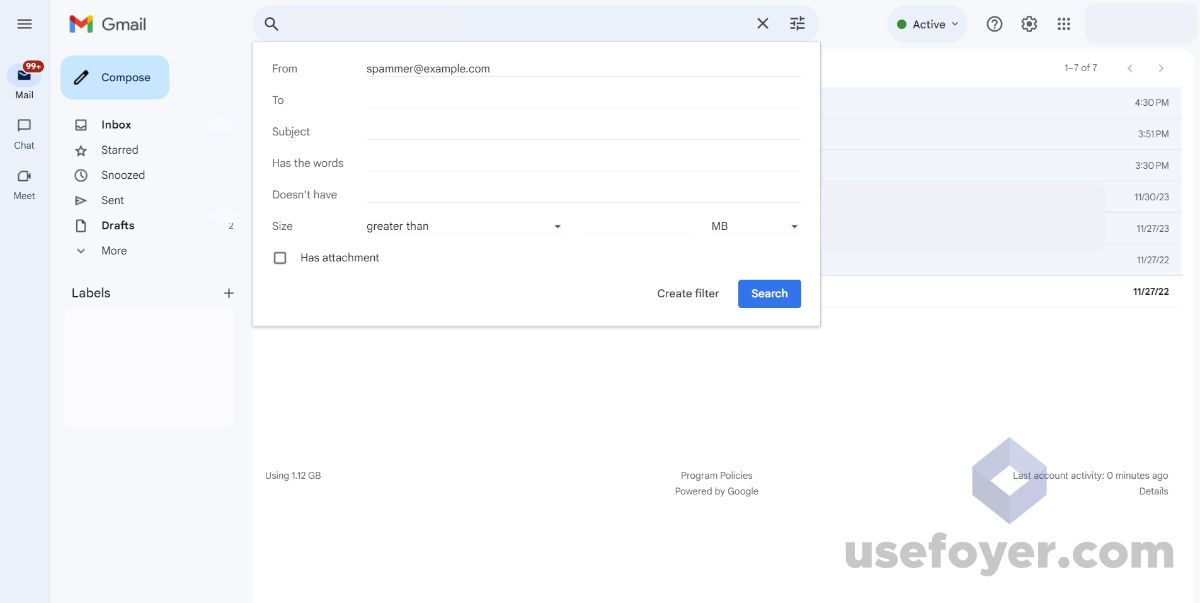 You can make an email filter in Gmail by navigating to any email within Gmail, clicking the 3 vertical dots, and selecting "Filter messages like this".
After clicking "Create filter", you can choose an action. You'll want to either delete the message, mark it as spam, or move it to a junk folder.
If you're using an email provider besides Gmail, there's likely a similar feature. Just search for "rules" for your email provider (this is a feature that Apple Mail, Yahoo Mail, and Outlook all support.
How to Report Emails as Spam (In Gmail)
If you're receiving junk emails, the best thing to do is to let your email service know that they are spam.
All the popular email services have an option to mark an email as spam (including Gmail, Outlook, Apple Mail, Yahoo Mail).
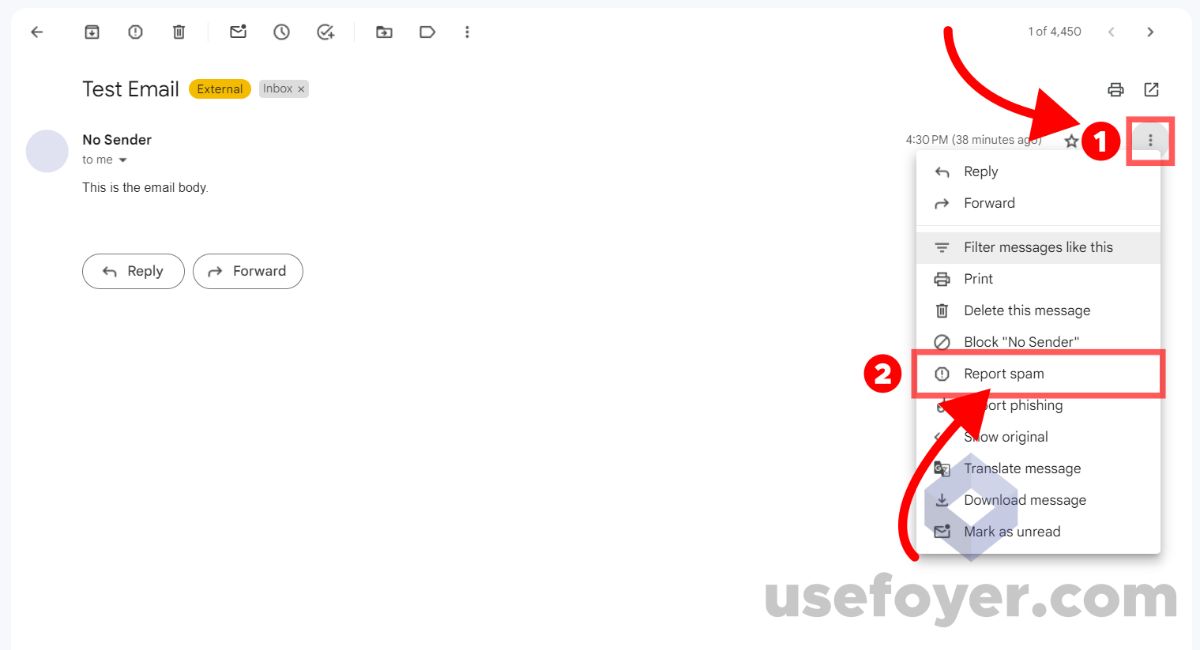 To do this in Gmail, just navigate to the spam email, and click on the 3 vertical dots on the right of the email.
Then, click the "Report spam" option.
It's that easy! Make sure to do this for every spam message. The more you report, the better Google's spam detection algorithm will automatically detect junk emails in the future.
Conclusion
I hope one of the many solutions we shared in this post helped you automatically handle those annoying no sender spam emails.
Remember, that the first step is to check if you can find the sender's real email address. Sometimes the actual sender's email address is there, and all you have to do is block by sender.
Otherwise, some email services (like Outlook) provide more complex rules that allow you to block emails based on empty emails.
If all else fails, you can always turn to blocking or deleting based on content in the email body or subject.
Also, be sure to report these emails as spam to your email provider. This not only move the spam to your junk folder, but it could help prevent those emails getting to you in the future.
Thanks for reading! If you have any feedback or questions, please send us a comment below.


